Windows 10 has a unique feature called "Windows Spotlight". It shows a group of pre selected photos by Microsoft on lockscreen. You can save them for later use including on your phone,laptops and PCs. Spotlight images are cached on your local PC and hidden in a particular folder. To save them to use as wallpaper, just follow the simple steps given below.
Steps:
Hold Windows Key and press R key(Win+R). It will open Run Dialog Prompt.
Now, Enter the following command without quotes and hit Enter. It will open a folder where all spotlight files is stored as cache.
Now, Copy and Paste all files to your desired folder.
You need to give JPG Extension to all files. To do that follow steps below.
Hold Shift key and Right click on the blank space of folder. Select "Open command prompt here" option. It will open a command prompt in the current directory.
Type this command without quotes and hit Enter.
"Ren *.* *.jpg"
Now, all files are converted to ".jpg" format. There will be some junk files along with wallpapers those aren't images at all.
Delete them. Remaining files are your spotlight wallpapers cached on your laptop/PC.
There will be some portrait images also. You can use them as your smartphone's lockscreen wallpaper.
Quantity of images depend on how many Spotlight images were produced/cached on your PC. You can re-run this tutorial every couple of weeks for new images.
There is a hidden administrator account in windows 10,8.1,8. It is inactive by default and needs to be enabled before it can be used. To use this hidden administrator account, follow the steps given below. Steps:
Click on Start button and type "cmd" without quotes.
Hit Enter and wait for results to display.
Right click on "Command Prompt" result and click on "Run as administrator" option.
It will open a command prompt with administrator rights. Now write the following command without quotes and hit Enter to active administrator account. It will show the message "The command completed successfully."
"net user administrator /active:yes"
Now,check for administrator named account. It will be activated.
Once account is activated, you can log in and change the password if you want.
To deactivate or make it hidden again, enter the following command without quotes and hit Enter.
"net user administrator /active:no"
It is advisable to keep the administrator account active and protect it with password. It can be useful in case of you lostcontrol of your account.
The Windows Master Control Panel is called as God Mode. It puts hundreds of settings from all around the operating system all in one place. God Mode doesn't add functionality. But it helps users work more efficiently by collecting all these tweaks and controls in one place. It can be created by using GUID of that particular setting.God Mode is shown in below picture.
As you can see, there are 228 settings all in one place. To create God Mode follow the steps.
GUID : {ED7BA470-8E54-465E-825C-99712043E01C}
Steps:
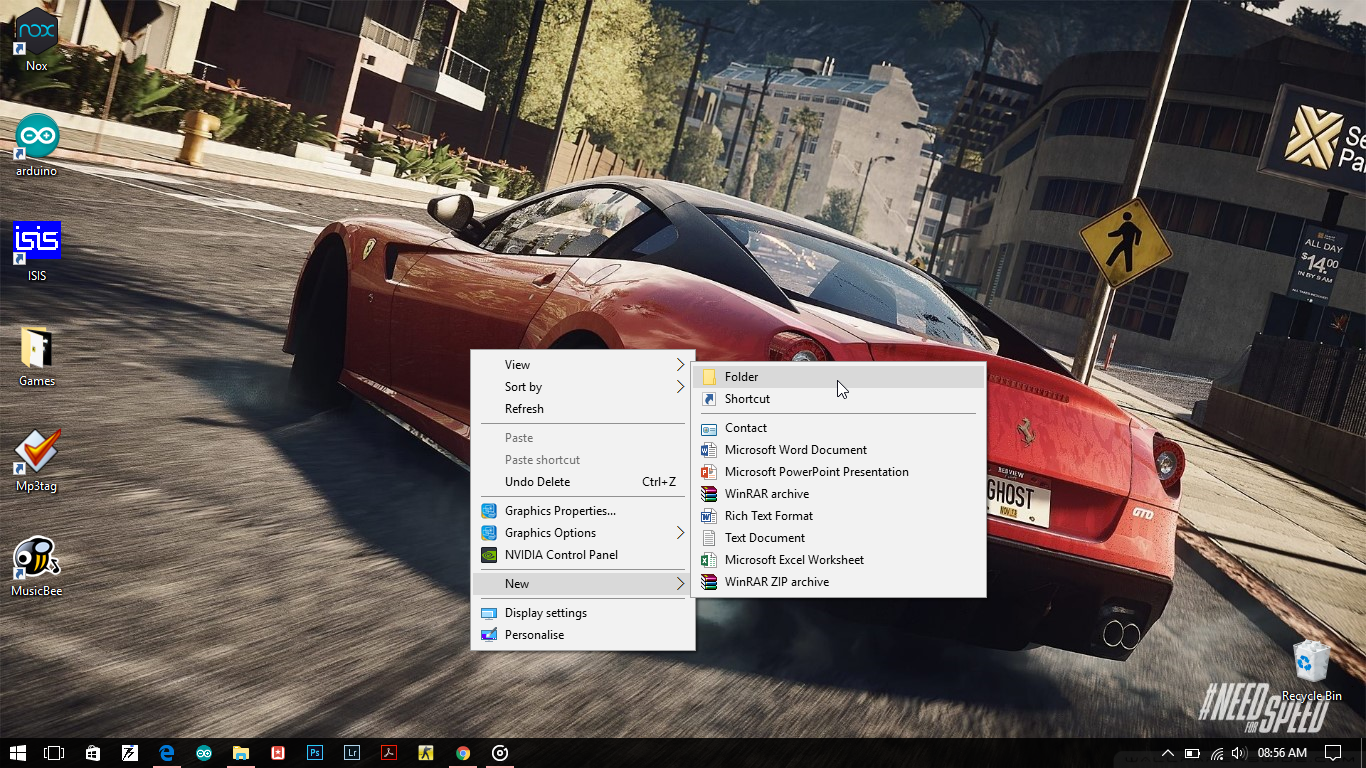
Right click on desktop.
Select New>Folder.
Give the following name to the Folder.(Without Quotes)
"GodMode.{ED7BA470-8E54-465E-825C-99712043E01C}"
Hit Enter.
The icon of folder will be changed to control panel icon. God Mode is created.Double click on it to open.You can move this shortcut anywhere you want.
Note:
God Mode is the name of this folder used by bloggers. You can give any name to that folder following by .GUID:
"Your Folder Name Here.{ED7BA470-8E54-465E-825C-99712043E01C}"
There are many Softwares available to hide your files and folders. But why to use those softwares when you can create a locker using notepad!!! The First advantage of this locker is you don't have to worry when you are formatting your PC.Locker is not created in your Windows drive (C:).you will always be able to use your locker after formatting. The Second advantage is if the ".bat" file is deleted by mistake then, you can creat new by same name as previous and you can access your locker.So don't worry about that .bat file!! You can create locker anywhere you want your files/folders to hide. The steps are given below with pictures. There is a video for demonstrating steps at the end. Steps For Creating Locker:
Open notepad.
Copy following code and paste it in notepad.
Code: ______________________________________________________ cls @ECHO OFF title Folder Locker if EXIST "Control Panel.{21EC2020-3AEA-1069-A2DD-08002B30309D}" goto UNLOCK if NOT EXIST Locker goto MDLOCKER :CONFIRM echo Are you sure u want to Lock the folder(Y/N) set/p "cho=>" if %cho%==Y goto LOCK if %cho%==y goto LOCK if %cho%==n goto END if %cho%==N goto END echo Invalid choice. pause goto CONFIRM :LOCK ren Locker "Control Panel.{21EC2020-3AEA-1069-A2DD-08002B30309D}" attrib +h +s "Control Panel.{21EC2020-3AEA-1069-A2DD-08002B30309D}" echo Folder locked goto End :UNLOCK echo Enter password to Unlock folder set/p "pass=>" if NOT %pass%==YOUR PASSWORD HERE goto FAIL attrib -h -s "Control Panel.{21EC2020-3AEA-1069-A2DD-08002B30309D}" ren "Control Panel.{21EC2020-3AEA-1069-A2DD-08002B30309D}" Locker echo Folder Unlocked successfully goto End :FAIL echo Invalid password pause goto end :MDLOCKER md Locker echo Locker created successfully pause goto End
Now, replace the line "YOUR PASSWORD HERE" with your desired password.
Go to file>Save As...
Go to the directory where you want to create a locker. In "Save as type" select "All Files (*.*)" option.
Type File name as "xyz.bat".replace "xyz" with your desired file name (Extension of file must be ".bat") click save button.
Now go to your directory where you have saved the file. There will be a file created with ".bat" extension.
The .bat file is your access point of your locker.
Double click on that file. It will open a command prompt with message that "Locker is created Successfully" as shown below:
Hit Enter.There will be a folder created named "Locker" in the same directory. This is your locker. Move your files and folders to this folder to lock it.
To hide the folder Double click on that .bat file again. It will open command prompt shown below.enter "y" to lock and hide the folder and hit Enter.
Now, check your directory. The "Locker" folder is not visible. It is locked and hidden.
To access it again, open .bat file. It will ask for password.
Enter password and hit Enter.
Now the folder is visible.
Note: Keep the code somewhere safe so that whenever the .bat file is deleted you can use it to make another one.Remember, the password must be same as previous and .bat file and hidden locker folder must be in same directory to use this method.(To re-access your folder). Video Guide:
Everyone knows how to make a folder/file "hidden" and how to show folders/files that have the "hidden" attribute.that is shown in below picture.
You can make a real Hidden folder/file by marking it as an important operating system file/folder.that way Windows won’t display it even if explorer is set to display hidden files and folders. Steps to Hide a Folder/File :
Go to the directory where your file/folder is which you want to hide.
Hold shift key and right click in blank space.
Select "Open command window here" option. It will open a command prompt in current directory so that you don't have to write the full path of your file/folder.
Now type the following command by replacing xxx with your file/folder name (type the file name with extension) and hit Enter.Here my file name is "info.txt".
attrib +h +s xxx
Now check the directory. Your file/folder is hidden completely. Even by turning on the "Show hidden files and folders" option, your file/folder will not be visible.
To Unhide File/Folder:
Simply follow the above steps for hiding folder by replacing command with this following command.Replace xxx with your file/folder name(Don't forget to type your file extension) and hit Enter.
attrib -h -s xxx
Now you can see that your file/folder is visible again.
Note: Don't forget name of hidden file/folder.Otherwise you cannot unhide the file/folder.
This tutorial works for both flashing Microsoft Lumia Devices and Downgrading to windows 8.1 from 10 Mobile
For flashing lumia devices you need: ● A compatible USB cable to connect the Microsoft Lumia device to the computer. ● A computer with Windows 7,8,8.1 or 10 operating system. ● A Microsoft Lumia device with Windows Phone 8,8.1 or 10 Mobile operating system. ● Backup the user content of the Microsoft Lumia device (optional). ● Minimum 4 GB free storage space from the computer. Downloads: You must need these things to downgrade/flash your device.Download it from below: Windows Device Recovery Tool: Official Installer Link:
lumiafirmware.com Installation/flashing Process: ● Create a new folder on desktop and rename it to "Package". ● Move the *.ffu file to this folder and rename it to "FullFlashUpdate.ffu". ● Connect your lumia device to the computer.
● Open a command prompt in administrator mode. ● Copy and past to the command prompt :
● For 32-bit architecture:
Command:
cd "%ProgramFiles%\Microsoft Care Suite\Windows Device Recovery Tool"
● For 64-bit architecture:
Command:
cd"%ProgramFiles(x86)%\Microsoft Care Suite\Windows Device Recovery Tool"
Now,press ENTER. ● Copy and paste the next command:
New York based interior designer & Lifestyle Guide Editor. Marfa tou leggings viral jack. Flannel flexitarian bespoke moon squid.
So glad you stopped by!


